Installation Manual
For AcuteConcept's AeroSense Headrest
Dear Fellow Aeron Chair Lover,
Thank You again for choosing and considering AcuteConcept.com!
Now please allow us to walk You through setting up AcuteConcept’s AeroSense Headrest for Your beloved Aeron Chair.
The installation would take about 5 minutes.
To ensure an Out-of-the-Box Setup Experience, we have included everything in the box for You.
Yes, we have even included a handy Phillips screwdriver to get you started. No fiddling around with the toolbox is required.
So let’s start with unpacking and checking the contents in the box, followed by the setup instructions below.
Be prepared to enjoy the Aeron Chair in a whole new dimension and fall in love with the Aeron Chair… Again!
Cheers,
KC
Founder – AcuteConcept.com (formerly AeronHQ)
The Headquarters of
Premium Aeron Chair Enhancements
Package Content
Check List
In the Box:
- AeroSense Headrest
(Headrest Only, Aeron Chair is NOT included) - Accessories Pack
- Coat Hanger Pack
| Accessories Pack |
|---|
| 1 x Phillips Screwdriver 1 x Allen Wrench Hex Key 1 x Shaft Removal key (silver color) 1 x Helix Core (for SecureHelix tilt adjustment) 1 x Hand Bolt for Height locking (spare) 1 x Hex Nuts for mount assembly (spare) 2 x Screw (spare) |
| Coat Hanger Pack (Optional, subject to order details) |
|---|
| 1 x Coat Hanger Left Arm 1 x Coat Hanger Right Arm 5 x Hanger Arm mounting screw (incl. 1 spare) |
Setup Instructions
In 5 Minutes
Step Zero: Coat Hanger (Optional)
The Coat Hanger should be installed Before the headrest is mounted onto the Aeron Chair.
If your purchase option did not include coat hanger, please skip this step and proceed to Step 1.
Maximum garment weight: 5kg (2.5kg per arm)
Required:
- 1 x Coat Hanger Left Arm
- 1 x Coat Hanger Right Arm
- 4 x Hanger Arm mounting screw
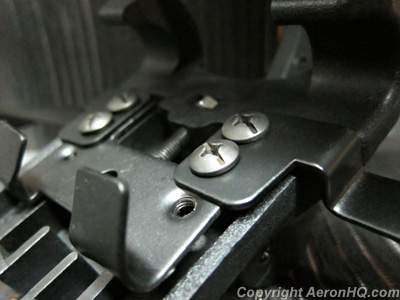
- Locate the metal bracket on the inner side of the AeroGrip headrest mount
- Two sets of THREE (3) mounting holes can be found on left and right side of the said metal bracket
- By using the top TWO (2) mounting holes, secure the Coat Hanger arms on both sides of the metal bracket by using the hanger arm mounting screws
- The coat hanger arms would run from the left and right sides and along the edges of the AeroGrip mount as illustrated
Final Step: Mounting the Headrest
Please note, the Coat Hanger (if required) should be installed Before the headrest is mounted onto the Aeron Chair.
If coat hanger installation is required, please go back to Step Zero.
Required:
- AeroSense Headrest
- 1 x Allen Wrench Hex Key
- Aeron Chair
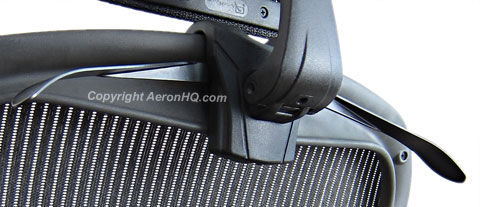
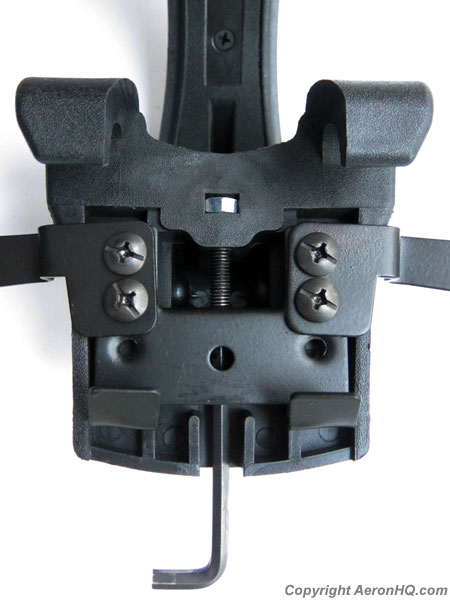
- Locate the Hex Bolt on the inner side of the AeroGrip headrest mount
- Loosen the hex bolt (without fully detaching it) with the hex key to open the bracket of the AeroGrip
- Locate the Herman Miller logo on the center line of the Aeron Chair back frame. This is where the headrest will be mounted
- Notice the logo sits on the point with the widest frame edge between the top and lower edge of the back frame, and the frame edge becomes narrower as the contour extends to the left and right side
- Starting from either the left or right side of the Aeron Chair back frame with the narrowest frame edge, slide the AeroGrip mount carefully onto the center line of the chair
- To help aligning to the center line, the Aeron Chair’s sizing key spots can be used. The key spots are located on the underside of the Herman Miller logo
- Fasten the hex bolt and metal bracket with the hex key to secure the headrest and finish mounting
- Please put the hex key back to its designated compartment after use.
Headrest Adjustments
Height, Tilt and Forward / Backward
Height
- Height adjustment is done by loosening the locking hand bolt attached on the ClickLoc Module (behind pillow mesh)
- Upon unlocking, the headrest pillow can slide up and down on the height height rail with click stops
- Simply tighten the hand bolt again to lock the headrest height
Tilt
FlexiShift (default mode):- Simply adjust the tilt angle manually when stand up or seated.
- Tilt angle can be fine-tuned by using the self-contained hex key.
- To make adjustments, insert the hex key to the adjustment hole located on the top of headrest trunk.
- Setting is self-locking with SecureHelix.
- Please put the hex key back to its designated compartment after use.
Forward / Backward
- The adjustment can be fine-tuned by using the self-contained hex key. The adjustment hole is located on the bottom of headrest trunk.
- To make adjustments, insert the hex key to the adjustment hole located on the bottom of headrest trunk.
- Please put the hex key back to its designated compartment after use.